 In this article, we will be exploring the procedure to properly utilize the MIDI Learn function in our MPC Software to create new MIDI Maps, allowing us to control MPC with any class-compliant midi controller.
CONTENTS
Key Terms
-
MIDI Learn is exactly what it sounds like! We are teaching the software how we want it to respond to certain MIDI signals sent by the controller.
- For example, by enabling MIDI Learn and selecting which software parameter we want to control, and then moving the desired control on the hardware, we are teaching the software to adjust the desired software parameter to respond when we move the control on the hardware. The control becomes "mapped" to that parameter in the software. More on this later.
- This is the basic function from which this entire procedure is grown.
-
MIDI Maps are the sum of our MIDI learning efforts - this is the list of MIDI messages and what software parameters they are connected to.
- These are essential for using a controller that MPC does not have a pre-loaded mapping for.
- These Maps are saved as files, allowing us to move them to other computers or reload them later so that we do not have to repeat the process again.
- We can also export/import these to other devices.
Setting Up MIDI Preferences
- On Mac, this is done by clicking on the program's name (MPC 2.0/MPC Beats) in the Menu Bar, then Preferences
- On PC, this is done by clicking Edit, then Preferences

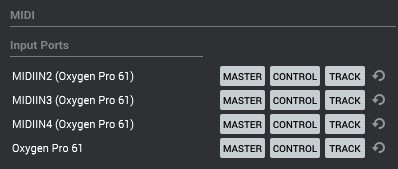
3. Click and highlight the Master, Control, and Track options for the controller you want to map

Your Midi Controller is now ready to be mapped!
Creating New MIDI Maps
-
Open MPC, and select the Midi Learn
 tab in the bottom right corner (or press ctrl+shift+L).
-
Make sure that Enable is selected in the Global Midi Settings.
-
Click on the rightmost button under Global Midi Settings and select New Midi Map.

-
Click on Bottom Panel
 in the bottom left corner of MPC to open a display with mappable assets.
-
Click on the Learn button in the Global Midi Settings menu to enable Midi Learn.

-
The mappable software parameters will now be highlighted in yellow.

-
With your MIDI controller connected, and the blank MIDI map we just created selected, simply click on which software parameter you would like to change and move the corresponding hardware component.
-
Learned functions will auto-populate under the Global MIDI Settings tab.
-
Rinse and repeat, until your controller is mapped to your liking!
-
Save MPC and make some music!
Exporting/Importing MIDI Maps
-
Click the button to the far right of the Global MIDI Settings tab and select Export.

-
It will ask you to define a location to export it, defaulting to C:\Users\(your user name)\Documents\MPC on a PC. Choose your location and press Save. Now you have a file that you can take with you!

-
To Import, go backward- click Import in that same drop-down menu, find the .xmm file to import, and click Load.

